One of the biggest hurdles of being self-employed or earning money from property is having to sort your own taxes. But fear not: there are some brilliant tools out there that can help you sort out this kind of financial admin in a fraction of the time it takes you otherwise. Like Coconut!
This guide will show you how you can use the Coconut app to find the numbers you need to fill in your Self Assessment tax return—whether you’re a sole trader, a landlord, or maybe even a combination of the two.
You’ll get the most value out of Coconut when you use it all year round, as it’ll ensure that you always have a good understanding of your incomings and outgoings, as well as how much tax to set aside. When you’re a regular user, it also becomes incredibly easy to submit your Self Assessment when the time comes—as you’ll only need to do a final check of your records and you’ll be ready to fill in the form.
But don’t worry if you’ve not used Coconut before! In this guide, we’ll also show you how to get set up on the app from scratch and still get your numbers in record-time.
Please note: this guide is for non-VAT registered sole traders and unincorporated landlords in the UK (including Scotland). If you’re VAT-registered or a limited company, this isn’t for you.
Before we start
If you're feeling uncertain about your finances, we strongly recommend you work with an accountant. Not only will they save you time and stress, but accountants are fully aware of what additional allowances can be claimed for tax—so can often help you get lower tax bills than if you’d completed the forms yourself.
And don’t forget: if you have one already, you can invite your accountant to Coconut through the app. Once your accountant has accepted your invitation, they’ll be able to view all of your business activity and bookkeeping data whenever they need to, via the Accountant Portal. Meaning no endless back-and-forth emails, no frantic searching for receipts, and no stress—for you or your accountant.
Step 1: Connect your bank accounts to Coconut (if you haven’t already)
If you’re new to Coconut, the first thing you’ll need to do once you’ve downloaded the app is connect any bank accounts you use for self-employment and/or property transactions. This enables you to see all of your finances in one place, making it much easier to figure out what’s what.
Don’t worry if you have personal transactions going in and out of these accounts as well—this is a very common challenge for self-employed people and property owners, and one of Coconut’s main benefits is that we make it very easy for you to unmuddle your business transactions from the personal ones.
When you first sign up to the app, you’ll be prompted to connect your accounts—just follow the instructions and you’ll be set up in minutes. To connect your accounts later (or to add more connections), simply head to your Home screen and tap on 'Connect Accounts'. Coconut supports connections with over 25 different bank and credit card providers.
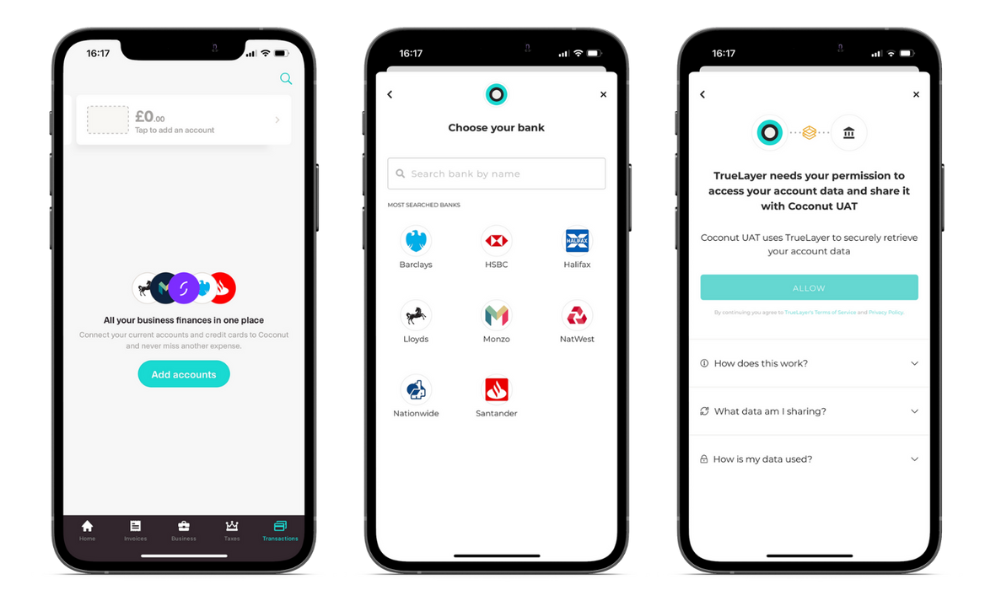
Check out this helpful article about connecting your bank accounts for further guidance.
Step 2: Add any additional income streams, if necessary
This step is only necessary if you have multiple streams of income, e.g. you are a sole trader with a rental property, you have both UK and foreign property, etc.
One unique feature of Coconut is that we make it incredibly easy for you to manage your finances even when you have multiple businesses and/or properties. By assigning different ‘income streams’ to your business transactions, you can distinguish income and expenses even when transactions are flowing in and out of the same accounts, allowing you to prepare your tax figures for HMRC even more easily.
When you first create a Coconut account, we’ll create your first income stream for you. But if you need to add others, simply follow these instructions:
- Navigate to the More tab and under ‘Income streams’, click ‘Add income stream’.
- Fill in the details of your additional income stream.
- Give your income stream a name—this should be something that you clearly recognise and associate with that business / property.
- Select a business type from the categories that HMRC uses. If you’re not sure which one to choose, follow our in-app guidance.
- If you selected one of the property types, you’ll have the option to set a percentage ownership (this is useful if you own a property jointly with others). If you are the sole owner, leave this figure as 100%. Otherwise, adjust it based on how much of the property you own personally. This will let us submit the correct calculation for income, expenses and tax saving suggestions pertaining to that property, ready for the tax return.
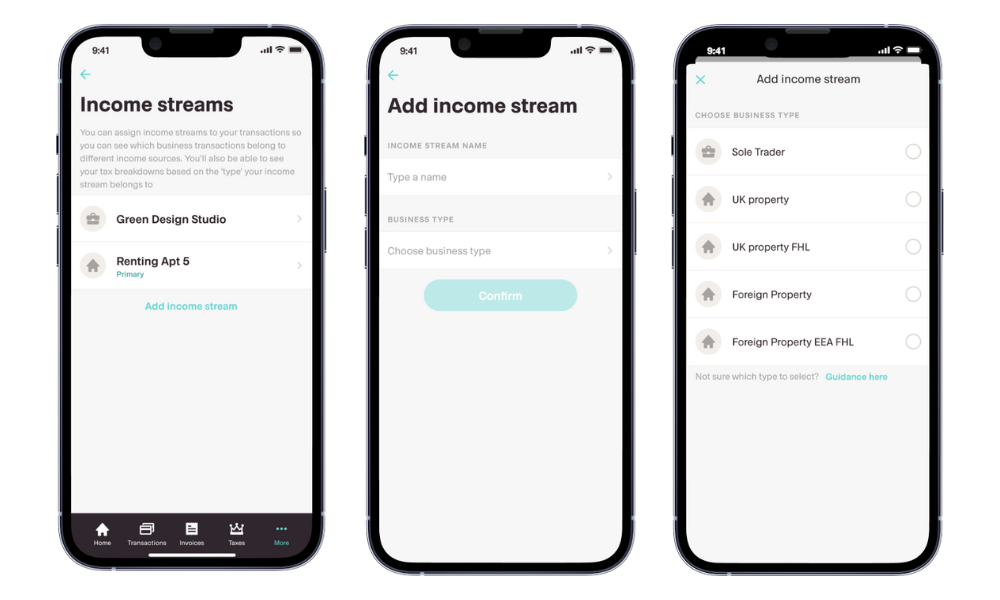
Find out more about setting up and managing different income streams.
Once your accounts and income streams are set up, you’re ready to start sorting your transactions.
Step 3: Ensure your income is categorised correctly
During this step, you’re looking to establish how much money you made from your various income sources for the tax year in question. For the tax return due by 31st January 2023, this means working out how much income you collected between 6th April 2021 and 5th April 2022.
When using Coconut to find your Self Assessment figures, there are two key things to do:
- Ensure that any business income in your bank feeds is categorised as such, and
- Manually add any other income that is not reflected in your bank feeds.
If you’re a regular Coconut user who has been categorising and adding transactions within the app throughout the year, you’ll just need to do a final check through your feeds to ensure that everything is in order.
If you’re new to Coconut, that’s fine too—just grab a coffee and you’ll soon get into the swing of it.
Categorising income in your bank feeds
Firstly, go to the Transactions tab and ensure that all of your self-employed and/or property income is correctly categorised as ‘Income’. You can do this by tapping into each relevant transaction and changing the category.
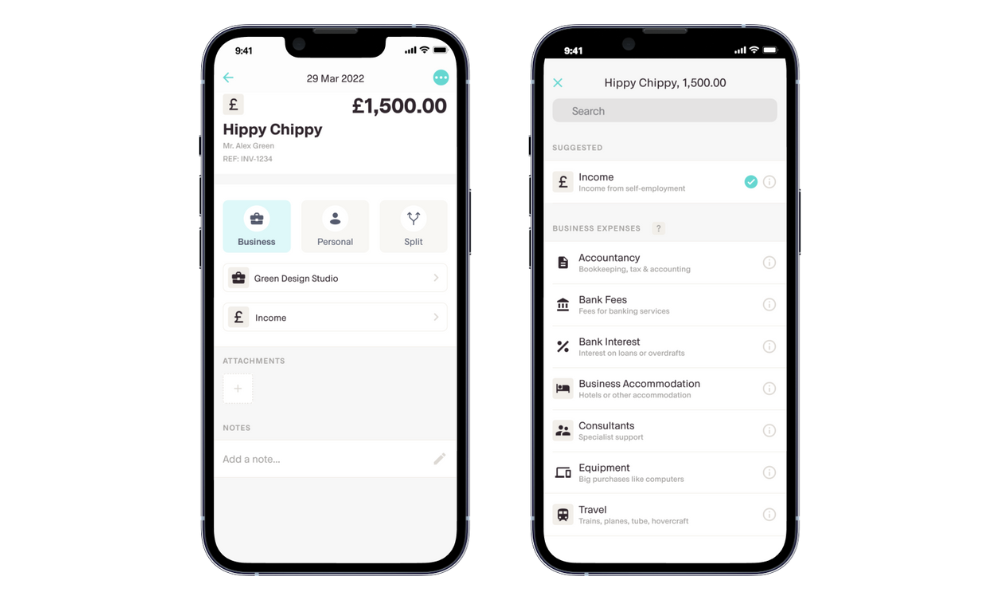
If you’re an iOS user, you can use our swipe function to do this even more quickly: simply swipe right on the transaction directly from your feed and you’ll be given the option to re-categorise it.
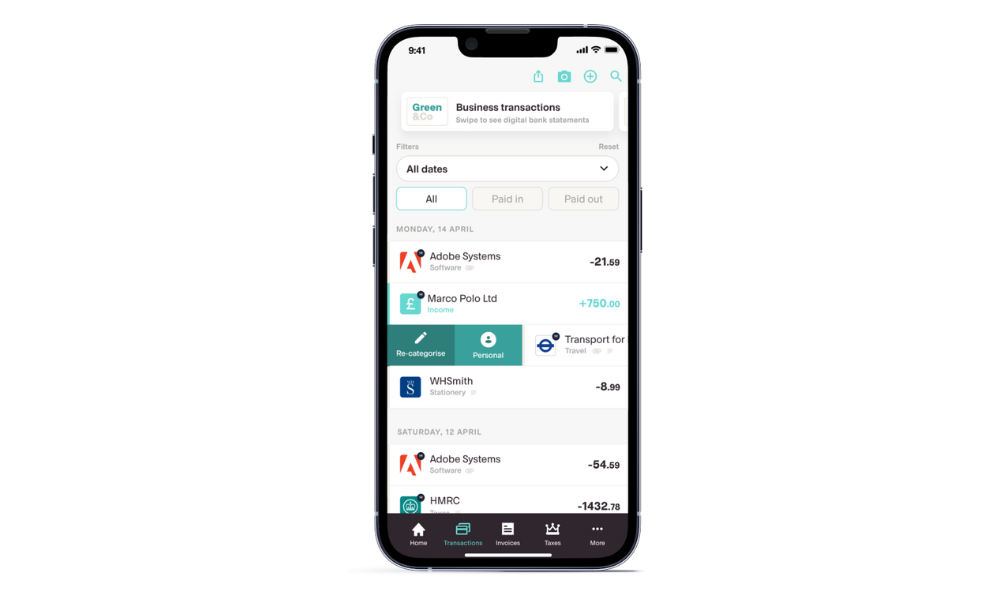
If you have multiple income streams, you’ll also need to make sure that you’ve assigned each relevant business transaction to the correct one.
The only exception here is income you’ve earned through employment. This is because employment income has already been taxed at source, and is therefore not relevant to your Self Assessment figures.
If you do receive employment income into a bank account that you’ve linked to Coconut, make sure you mark this as ‘PAYE income’ (not ‘Income’) to ensure that it will be excluded from your Self Assessment totals.
A note on income from services such as iZettle: if you have any income where fees are deducted before they arrive in your account, then you should make sure you reflect these fees in your expenses (see below) by adding a manual transaction. If you don’t account for these, it could have implications for things like mortgage applications or business growth loans in the future.
Categorising income that has not been reflected in your bank feeds
It’s possible that you’ll have income (and expenses, for that matter—but more on that below) that are not reflected in your bank feeds. This includes things like cash payments, or income paid into other accounts not connected to Coconut. Perhaps you receive income into a Paypal account and have not transferred those funds into an account connected to Coconut, for example.
To ensure that your Coconut numbers show the whole picture, it’s important to capture all of these additional incomings and outgoings in the app. You can do this by adding what we call ‘manual adjustments’.
To do so, head to your Transactions tab, select the "+" symbol in the top right-hand corner, and let the app guide you through each screen. For more information on how manual adjustments work, head to this Help Centre article.
Check your invoices have all been paid
Did you know that Coconut lets you create invoices, send them to clients, track whether or not they’ve been paid, and match them with incoming payments?
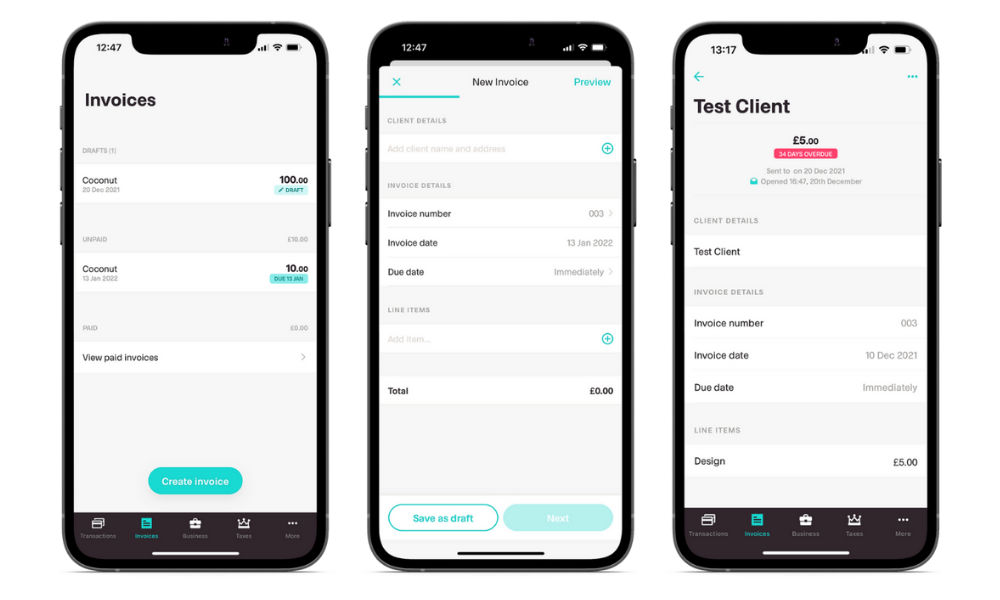
As such, if you use Coconut to do your invoicing, you should take some time to ensure that all of your invoices for the tax period are paid and linked to the relevant transactions in your feeds.
Step 4: Ensure your expenses are categorised correctly
Now it’s time to go through the same process for your expenses.
In this step, you’re looking to find out how much you spent on ‘allowable expenses’ for the tax year in question. And just as with your income, you’ll need to make sure you include expenses both in and outside of your bank feeds. After all, you want to make sure you’re claiming the maximum amount of tax relief possible.
Just as with the step above, you should head to the Transactions tab and work your way through your bank feeds to ensure that all self-employed and/or property expenses are marked as ‘Business’, and that you also link them to the correct sub-categories. Make sure you’re also assigning your expenses to the correct income streams, if relevant.
To speed up the process, Coconut allows you to quickly apply the same category to multiple transactions from the same merchant. And if you have transactions that are part-business, part-personal, Coconut also allows you to split them, as below.
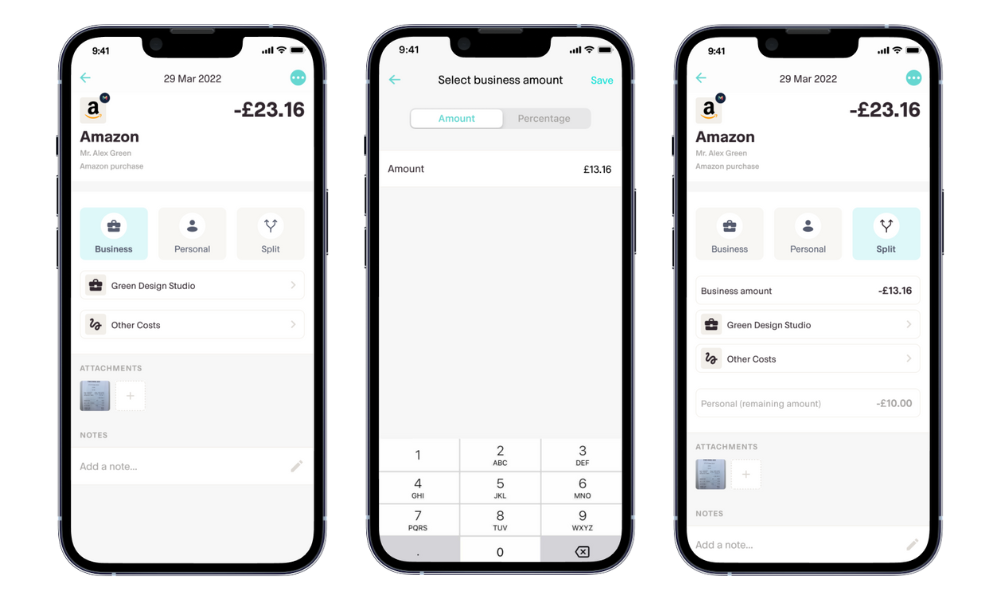
If you have any additional expenses to add, for example if you paid in cash, then you should add a manual transaction under the appropriate category.
Capturing receipts
Whenever you record or categorise a business expense, it’s good practice to snap a picture of the associated receipt and attach it to the transaction, in case HMRC asks to see proof of the expense at a later date.
To do so, just click into the relevant transaction, and tap the ‘+’ under ‘Attachments’. You can add notes to your transactions too, should you wish to remind yourself or notify your accountant of something, later down the line.
Learn more about adding receipts to transactions.
Simplified expenses for sole traders
As a sole trader, you may prefer to use simplified expenses. Simplified expenses are a way of calculating some of your business expenses using flat rates, as opposed to working out your actual business costs.
Simplified expenses can be used for business costs for some vehicles, working from home allowances, and living in your business premises. You don’t have to use simplified expenses, but some sole traders do find that it’s easier and quicker than working out their exact costs.
Whichever method you use, make sure these numbers are included in your Coconut app—either by categorising relevant transactions, or adding manual adjustments.
Check if simplified expenses are better for your business
P.S. If you’d prefer to calculate an exact figure to claim for your working from home expenses (using the ‘reasonable method’ rather than simplified expenses) you can use our free Working From Home Tax Relief Calculator.
Step 5: Get your final numbers for your tax return
Once you’ve categorised all of your transactions in the app, you can now access the numbers you need for your tax return!
Sole traders
If you’re a sole trader, you can find these numbers by heading to the Tax tab within the app. Scroll down to the ‘Self Assessment section’ and click ‘View your self-employed tax return’. You will now see all the income and expense figures you need.
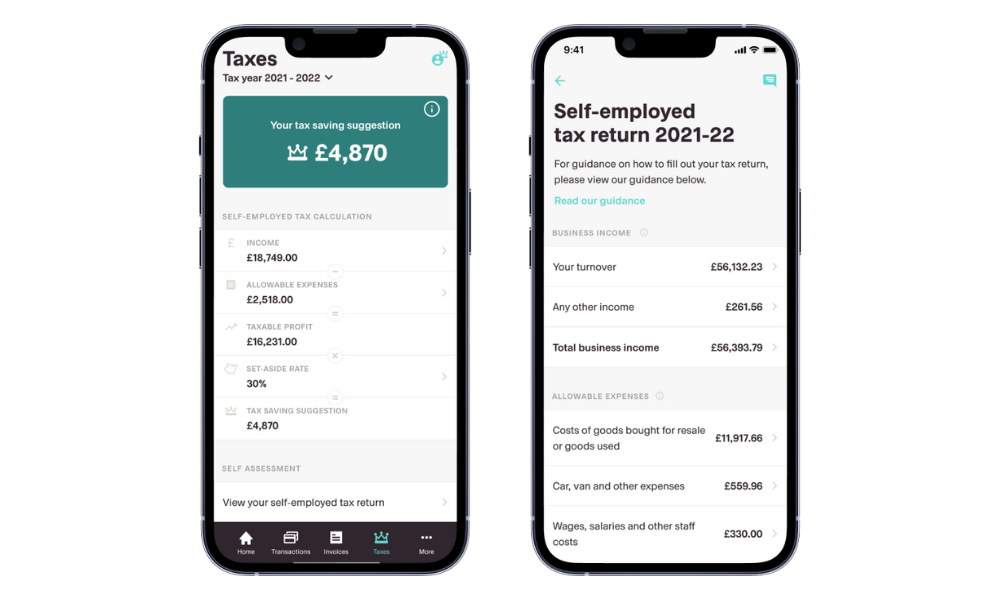
If you’d prefer to see this information on desktop, simply open up the Reports tab on Coconut Web. As a non-VAT registered sole trader, you’re looking for the SA103S report.
We've integrated up with GoSimpleTax so you can file your tax return directly to HMRC via a click of a button. Effortlessly transfer your data from Coconut directly into GoSimpleTax. This streamlined process ensures that your tax return is populated accurately and promptly, ready for submission directly to HMRC. To file your tax return using GoSimpleTax, simply login to your Coconut account via desktop, click on the Self Assessment tab and connect your Coconut account to GoSimpleTax.
Property owners
To find all of the numbers related to your property income, log into Coconut Web and head to the Reports tab. The report you’ll need depends on the type of property/ies that you own:
- The SA105 report is for those with UK/EEA property (choose FHL non-FHL as applicable for you)
- The SA106 report is for those with foreign property
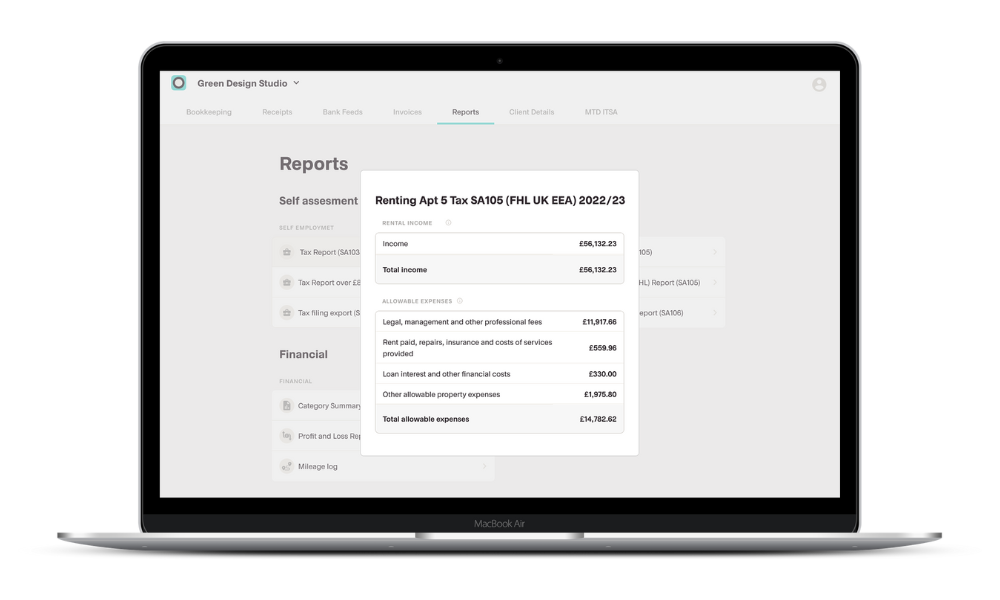
Click on the report you need and you’ll find all of your income and expense figures, ready to fill in your tax return.
Filling in your Self Assessment
Congratulations! You now have the income and expense figures that you need ready to fill in your Self Assessment form.
Before you sit down to do so, there will be other personal information that you’ll need to have to hand. This will depend on your personal circumstances and setup, but may include:
- National Insurance Number
- Unique Taxpayer Reference
- Government Gateway User ID
- Details of income or interest from savings or investments (Savings account or investment company statements)
- Details of any income you’ve had from any employment (as opposed to self-employment). This includes your P60 form (given annually by your last employer); P45 (given to you by your employer when you leave); P11D (a form your employer would have used to tell HMRC about any ‘benefits in kind’ (eg company car) you received)
- Details of any chargeable capital gains made during the year (that is, any personal assets you’ve sold—or otherwise disposed of—worth more than £6,000, except your car). That could include cryptocurrency.
- Details of any income from partnerships
- Details of charitable donations and Gift Aid
- Details of pension contributions
- Redundancy payments/employment benefits
Once you’ve got everything you need, it’s time to finally tick that tax return off your to-do list. For further guidance on how to complete the form itself, check out our step-by-step guide to filling out your Self Assessment.
Next year’s tax return
To make your next tax return easier, you could sign up for a dedicated business current account (if you don’t have one already). This will mean all your income and outgoings occur in the same place…which is much easier to cope with on day of reckoning.
You could also consider working with an accountant as your affairs become more complex. They’ll be able to provide you with ongoing business advice as well as give you peace of mind when it comes to compliance—allowing you to focus on what you do best.
Either way, using Coconut on a regular basis will enable you to track your income and expenses as you go, and work out how much tax you need to set aside throughout the year.
Haven’t got your Coconut account yet? Sign up now to save time and stress on your upcoming tax returns.


